ToolBar微件
ActionBar/AppBar即操作栏/应用栏,它们是一个概念。
原生默认主题里面一般会带有原生ActionBar来实现应用栏。不同安卓版本的原生ActionBar均有略微区别,带来碎片化的体验,因此我们可以使用ToolBar微件代替原生ActionBar来实现应用栏。它可以在不同安卓版本上带来优秀一致的体验。
用ToolBar来实现应用栏的步骤
1. 添加支持库 Appcompat ,一般原本项目中就有该支持库的。
2. 确保Activity 继承 AppCompatActivity
class MyActivity : AppCompatActivity() {
      // ...
}
3. 在应用清单manifest中,修改为不带原生ActionBar的主题,例如:
<application
    android:theme="@style/Theme.AppCompat.Light.NoActionBar" />
4. 在Activity 对应的布局xml文件中添加toolBar布局。可以利用设计工具直接在编辑器中添加。
5. 在 Activity 的 onCreate()方法中,调用 Activity 的 setSupportActionBar() 方法,并传入 Activity 的toolBar。此方法会将toolBar设为 Activity 的应用栏。例如:
override fun onCreate(savedInstanceState: Bundle?) {
    super.onCreate(savedInstanceState)
    setContentView(R.layout.activity_my)
    // Note that the Toolbar defined in the layout has the id "my_toolbar"
    setSupportActionBar(findViewById(R.id.my_toolbar))
}
在应用栏添加向上按钮
这里使用了一个新的类:NavigationUI 它也是导航组件的一员。
它可以重设应用栏,增加显示一个向上按钮便于回退操作。
class MainActivity : AppCompatActivity() {

    override fun onCreate(savedInstanceState: Bundle?) {
        super.onCreate(savedInstanceState)

        val binding = DataBindingUtil.setContentView<ActivityMainBinding>(this, R.layout.activity_main)

        setSupportActionBar(binding.toolbar)
        // my_nav_host_fragment 是在xml布局文件中添加的`NavHostFragment`。
        val navController = findNavController(R.id.my_nav_host_fragment)
        // 通过导航UI,在应用栏添加一个向上按钮
        NavigationUI.setupWithNavController(binding.toolbar, navController)
    }
}
给应用栏添加溢出菜单/按钮
首先需要创建menu资源文件。
在menu资源中,在Palette中直接拖动items到menu组件下即可。
接着,items的showAsAction属性可以指定按钮的位置。它有以下几种值可以选:
- Always 它永远显示在Toolbar中,空间不够直接不显示。
- ifRoom 在屏幕空间足够的情况下在Toolbar中显示。否则在菜单中显示。
- never 永远只在菜单中显示。
在fragment类中应用栏添加菜单的示例(在activitiy类中添加菜单与之类似):
override fun onCreateView(inflater: LayoutInflater, container: ViewGroup?,
                         savedInstanceState: Bundle?): View? {
   ...
   setHasOptionsMenu(true)  // 添加该句
   return binding.root
}

// 创建菜单
override fun onCreateOptionsMenu(menu: Menu, inflater: MenuInflater) {
    super.onCreateOptionsMenu(menu, inflater)
    inflater?.inflate(R.menu.options_menu, menu)
}

// 此处为具体实现操作,根据实际应用覆写。
override fun onOptionsItemSelected(item: MenuItem): Boolean {
   ......
}
给应用栏添加导航抽屉
1. 在gradle构建文件中添加材料库,一般默认会带有。
dependencies {
    ...
    implementation "com.google.android.material:material:$supportlibVersion"
    ...
}
2. 创建抽屉内部菜单
在项目窗格中,新建资源文件,资源类型为Menu。
它负责抽屉的多个菜单选择。添加子项目时,id要与指向的Fragment的id对应,这样方便后续的导航。
3. 创建抽屉头部布局
新建资源文件,资源类型为layout。
它负责抽屉头部显示的内容。
4. 打开activity的xml布局文件,将视图的根视图调整为DrawerLayout。
<layout xmlns:android="http://schemas.android.com/apk/res/android"
   xmlns:app="http://schemas.android.com/apk/res-auto">
   <androidx.drawerlayout.widget.DrawerLayout
       android:id="@+id/drawerLayout"
       android:layout_width="match_parent"
       android:layout_height="match_parent">

   <LinearLayout
       . . .
       </LinearLayout>
   </androidx.drawerlayout.widget.DrawerLayout>
</layout>
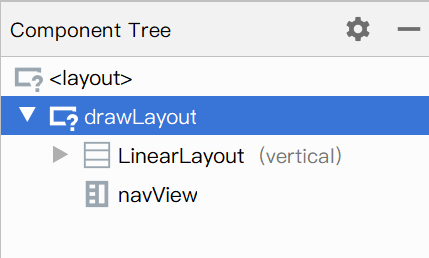
5. 添加导航抽屉(navView)。它的位置如下图所示。

具体的xml内容为。它可以通过窗格在编辑器中拖动添加,但是其中一些属性必须设置好。否则没有效果。
<com.google.android.material.navigation.NavigationView
   android:id="@+id/navView"
   android:layout_width="wrap_content"
   android:layout_height="match_parent"
   android:layout_gravity="start"   // 关键属性,决定折叠
   app:headerLayout="@layout/nav_header"   // 填写抽屉头部布局
   app:menu="@menu/navdrawer_menu" />  // 填写抽屉的菜单
通过以上,设定导航窗格已经可以通过右滑左边框调出了。
6. 将导航抽屉的菜单连接到导航控制器
这样按下导航抽屉里的子项目即可跳转。
// 在 onCreate()方法中添加该句
NavigationUI.setupWithNavController(binding.navView, navController)
7. 在应用栏添加导航抽屉按钮
使用户在应用栏左上方抽屉按钮访问导航抽屉。注意这个导航抽屉一旦传入NavigationUI,它将使应用程序拥有了向上按钮和导航抽屉按钮。只不过按键逻辑上需要重写。
class MainActivity : AppCompatActivity() {
    private lateinit var drawerLayout: DrawerLayout
    override fun onCreate(savedInstanceState: Bundle?) {
        super.onCreate(savedInstanceState)
        val binding = DataBindingUtil.setContentView<ActivityMainBinding>(this, R.layout.activity_main)

        drawerLayout = binding.drawLayout

        setSupportActionBar(binding.toolbar)

        val navController = findNavController(R.id.my_nav_host_fragment)

        // 将导航抽屉的菜单连接到导航控制器
        NavigationUI.setupWithNavController(binding.navView, navController)
        // 添加导航抽屉按钮
        NavigationUI.setupActionBarWithNavController(this, navController, drawerLayout)
    }
    // 重写导航按钮和向上按钮的逻辑,这样按下按钮可呼出抽屉
    override fun onSupportNavigateUp(): Boolean {
        val navController = this.findNavController(R.id.my_nav_host_fragment)
        return NavigationUI.navigateUp(navController, drawerLayout)
    }
}